Anime Studio Pro 7 - Creating a Character for Animation - Tutorial 02 - 0

Crishani | 3:22 AM |

11. If you have Anime Studio Pro click on the  
Style Box and select New.


In the name field that opens call the colour something like Skin
or Head and click in the Fill Colour Box (circled).
If you have Anime Studio Debut you won’t have the option of
saving styles so just click on the Fill Colour Box and continue...


12 .In the Colour Picker window select a suitable colour for
your characters skin tone and click OK.


Now do the same for the outline colour. I usually make the
outline a darker shade of the fill colour.
You can also press the spacebar on your computer keyboard to
apply a style to a selected shape
You should now have something like this.


13. Now do the same for the hair. Create a new Vector Layer,
double click it and name it Hair Back. Trace the outline of the
hair that would be at the back of the head. Drag this layer below
the Head Layer as the hair needs to be behind the head.


Note: If you find it difficult to trace the hair with the head layer
showing you can make a layer invisible by clicking on it’s little
eyes.


If you want to make your shapes perfectly symmetrical create
one half, select it with the Select Points Tool, copy it with the
Copy command from the Edit drop down menu at the top of the
screen and then paste it via the same Edit menu and while still
selected, again at the top of the work area, click on the Flip
Points Horizontally Tool (circled). You can then just join the
two centre points together by dropping one onto the other to
create your perfectly symmetrical whole shape.
You will notice I also have Lasso Mode checked. This enables
me to freely select (lasso) points and not have to drag a box
around them.


14. Don’t forget to name your shape.                              
Use the Select Shape Tool to select your shape and in the
Style Palette type Hair Back into the name shape field.


15. As you did before with the skin colour for the head shape
click on the Style Box and select New.


TO BE Continue ......


Anime Studio Pro 7 - Creating a Character for Animation - 0

Crishani | 1:37 PM |

When you first open Anime Studio Pro you should see a layout like that shown below. In the centre of the
screen is the main work area with a default character visible called Thorn. On the left is the Tools Palette,
along the bottom is the Timeline and on the right are the Style Palette and Layers Palette. At the top of the
screen are the Main Menu Bar and just below it is the Tool Options Bar. The latter will open and offer extra
options when tools are picked from the Tools Palette.

Anime Studio Pro is so intuitive that you’ve probably already found the Manipulate Bones Tool in
the Bone section of the Tool Palette and had a go at moving the limbs of the character around. Feel free, of
course, to experiment some more but don’t spend too long as we need to get on with creating our character.
Close Anime Studio and either get out some paper and pencils or open up your favourite drawing software.

1. Create a sketch of your character either drawn on paper or    
in your favourite software. I designed this Flea for a film I’m
working on. Your character will probably be quite different.
Draw your character, as I have, in a fairly neutral pose as this
will make it a lot easier once you come to trace it in Anime
Studio. After all, you will pose it nicely later when you come to
animate it.
Are you happy with your character?
Let’s begin the tracing process now.

2. We need to create a new project to start
from so go to the File Menu at the top left of
the workspace and choose New from the Drop
Down Menu that opens. The new clean
project should look like the one on the Left.
Before you do anything Save your project by
going to the File Menu / Save and browse to a
suitable folder on your computer. Name your
project My_Character or something else
suitable.

3.Import your sketch to an Image Layer as described below.   
Note: If you sketched your design on paper you will need to
either scan it into your computer or photograph it with a digital
camera and get it into your computer that way
Make sure you are on frame 0 in the Timeline. All character
construction takes place on this frame. Click on the New Layer
icon at the top of the Layers Palette and choose Image. Browse
to where you saved your sketch on your computer and import it.


4. In the Layer Palette on the left of the work area use the                            
Scale Layer Button to scale your character to fill the work area.


5. Create a Bone Layer and name it Front by double clicking
on it. Our character layers need to be created inside this bone                  
layer in order for the character to be posed and animated later.
You can drag layers inside a bone layer at any time by the way.


6. Create a Vector Layer and drag it onto the Bone Layer by
placing your cursor over the Vector Layer, pressing and holding 
the Left Mouse Button and dragging. When the Bone Layer
turns red release your mouse button and the Vector Layer
should now appear under the Bone Layer as shown right.
Note: You can check your Vector Layer is under the Bone
Layer by clicking on the little arrow ( circled ) to expand and
contract the bone layer.
Rename the layer to Head by double clicking on it.

7. Click on your Head Layer to make it active and using the      
Add Point Tool trace the outline of your characters head
starting from the top centre. Leave the cheek area ( as shown in
the picture below ) as later we need to place the mouth on a
separate layer so it can be animated independently.
Note: To use the Add Point Tool left mouse click to create a
point and, keeping the mouse button pressed, move around your
head and release the mouse button. Click over the point just
created to weld to it and then repeat this process of click drag
click drag around the outline of your head.


8. Your head should look something like this. You want to use
just enough points to create a nice shape that closely matches     
your sketch.
Note: If you need to sharpen curves at a point select the point
then ctrl+P on the keyboard. To smooth again ctrl+M.
CMD+P and CMD+M on a Mac.


9. The shape should automatically be filled on completion. If
not then you need to make your vector outline a shape by using     
the Select Points Tool in the Tools / Draw Palette to
select your shape then clicking on the Create Shape Tool
Your shape is unlikely to be filled with the correct colour so you
need to change the fill to the colour of your choice.


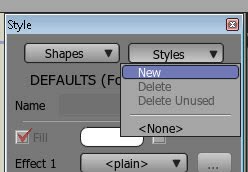
10. Firstly let’s name our shape so that it can be selected easily   
if it becomes hidden beneath other shapes.
If the Style Window isn’t open go to the Window drop down
menu at the top of the screen and open it.
Click on the Advanced box at the lower left of the Style                
Window to reveal the advanced options. Note that there are a
few more options available in the Pro version of the software
than there are in Anime Studio Debut. More about that later.
Use the Select Shape Tool to select your shape if it’s not
already then in the Style Palette type Head into the name shape
field that opens. It’s then possible to select your shape at any
time by selecting it in the Shapes drop down list in the Style
Palette if it’s not easily accessible with the Select Shape Tool.


Thank you ...         TO BE Continue ......

A History of Human Art and Body Painting 0

Crishani | 10:55 AM |

If the impulse to create art is a defining sign of humanity, the body may well have been the first canvas. Alongside paintings on cave walls visited by early people over 30,000 years ago, we find handprints, ochre deposits, and ornaments. And because the dead were often buried with valuable possessions and provisions for the afterlife, ancient burials reveal that people have been tattooing, piercing, painting, and shaping their bodies for millennia.

All of the major forms of body art known today appear in the ancient world, and there is no evidence indicating a single place of origin for particular techniques. Like people today, ancient peoples used body art to express identification with certain people and distinction from others. Through body art, members of a group could define the ideal person and highlight differences between individuals and groups. In the past, as today, body art may have been a way of communicating ideas about the afterlife and about the place of the individual in the universe.

A variety of objects demonstrate the use of body art in ancient times including an Egyptian fish-shaped make-up palette from 3650 BC to 3300 BC; a painted Greek vase from the fifth century BC depicting tattooed Thracian women; a ceramic spout bottle depicting the pierced face of a Moche warrior of Peru from AD 100-700; and ceramics of painted Nayarit women from 300 BC to 300 AD.

As people from one culture encounter people from another, the diversity of body art can be a source of inspiration, admiration, and imitation. Yet since body art can so clearly signal cultural differences, it can also be a way for people from one culture to ostracize others.

Body art links the individual to a social group as an insider, by asserting a shared body art language. Or it distinguishes outsiders, by proclaiming a separate identity. This concept is explored in Identities, which includes exhibits on tattooing in Japan, New Zealand, the Marquesan Islands, and the contemporary U.S, as well as African and Western piercing.

Body art practices can change rapidly, reflecting larger shifts in society. Tattooing virtually disappeared in Polynesia, partly due to Western influence, but it is now being revived as an assertion of ethnic identity. Western body art, including everything from piercing to shoe styles, also indicates a person's social identity.

In a complex and diverse society, when certain types of body art are shunned by some, they can become signs of rebellion for others. But as unfashionable body art practices become the norm, they lose their power to define group membership and instead express individual choices and life experiences.


Body Painting


Body painting can transform a person into a spirit, a work of art, another gender or even a map of a sacred place. It can emphasize visual appeal, express allegiance or provide a protective and empowering coating. Protective body paints often feature in initiation rituals, weddings and funerals -- all occasions of transition and of spiritual danger. People everywhere adorn the living, and some also treat the dead, with body paint. To make body paint, pigments composed of plant extracts or mineral clays and powders can be mixed with vegetable oil or animal fat. Throughout history, the substances used for body paint have been important trade items. Ochre, camwood, cinnebar, and kaolin were traded throughout Asia, Africa and Europe.


Henna, used as a temporary skin dye, was widely traded in the Muslim world along with patterns and designs used to apply it. Commercially manufactured body paints, now available in a wider palette, may be adopted for their visual appeal but they rarely take on the symbolic significance of natural paints and dyes.


Anime Studio 7 Tutorial 04 - Content Library - 0

Crishani | 10:27 AM |

Anime Studio 7 Tutorial 03 - Brush Styles-
watch this and try to do .. Happy Cartoon future ... lolzz.. Thank You...!!! ..


Anime Studio 7 Tutorial 03 - Brush Styles - 0

Crishani | 10:14 PM |

Anime Studio 7 Tutorial 03 - Brush Styles-
watch this and try to do .. Happy Cartoon future  ... lolzz..    Thank You...!!! ...


Anime Studio 7 Tutorial 02 - Bone Rigging - 0

Crishani | 12:02 PM |

Anime Studio 7 Tutorial 02     watch this and try to do ..
Happy Cartoon future  ... lolzz..    Thank You...!!!

Anime Studio 7 Tutorial 01 0

Crishani | 8:54 AM |

Anime Studio 7 Tutorial 01     watch this and try to do this things..


Happy Cartoon future  ... lolzz..    Thank You...!!!!!!!!

Do u like create cartoons...? 0

Crishani | 8:03 AM |


Hi everyone. How are you..?  What does u think about cartoons..? do you like cartoons..? I also like very much. Do u like learn 2D animations? (How to make a cartoon)
OK hopes all of u like it. It’s very interesting. As a first step watch following video clips. And get ideas.


How can do like this.? This animation is create by using Anime Studio Pro. 1st you download Anime Studio Pro 7


S/N :- ZP70CCD-0001-09NC-AQC0-500D-NHE4

Then I will teach you how work with Anime Studio Pro 7


Bye gays
Keep in touch..
 

Hybrid Modulation 11

Crishani | 2:48 AM |

Introduction

Quadrature amplitude modulation (QAM) is both an analog and a digital modulation scheme. It conveys two analog message signals, or two digital bit streams, by changing (modulating) the amplitudes of two carrier waves, using the amplitude-shift keying (ASK) digital modulation scheme or amplitude modulation (AM) analog modulation scheme. These two waves, usually sinusoids, are phase with each other by 90° and are thus called quadrature carriers or quadrature components hence the name of the scheme. The modulated waves are summed, and the resulting waveform is a combination of both phase-shift keying (PSK) and amplitude-shift keying (ASK), or in the analog case of phase modulation (PM) and amplitude modulation. In the digital QAM case, a finite number of at least two phases and at least two amplitudes are used. PSK modulators are often designed using the QAM principle, but are not considered as QAM since the amplitude of the modulated carrier signal is constant. QAM is used extensively as a modulation scheme for digital telecommunication systems.
 
We'll use a signal that is transmitting at 3600 bps, or 3 bits per baud. This means that we can represent 8 binary combinations.
We'll use 2 measures of amplitude, 1 and 2, just we did before. We'll also use 4 possible phase shifts, like we did before. Combining the two, we have 8 possible waves that we can send. How convenient.
First step is to generate a table to show us which waves correspond to which binary combination. This can basically be done at random, although modem manufacturers have agreed on standards.

Bit value
Amplitude
Phase shift
000
1
None
001
2
None
010
1
1/4
011
2
1/4
100
1
1/2
101
2
1/2
110
1
3/4
111
2
3/4
 

Let's encode a big bit stream:
001010100011101000011110
First, we break it up into 3-bit triads:
001-010-100-011-101-000-011-110
Now all we have to do is figure out what the resulting signal should look like. Remember that we shift each wave relative to the wave before it!


Divider  :-

                       A direct 16 quadrature amplitude modulation (QAM) modulator based on the six-port technique is proposed. It uses a six-port passive microwave network to implement the modulation scheme with suitable terminations. A microwave prototype was built to validate the 16 QAM modulation up to 200 Mbit/s data rate at 4.2 GHz carrier frequency


Gmail and Google Voice Integration: Three Missing Ingredients 0

Crishani | 2:45 AM |

On Wednesday Google launched a new Gmail feature that lets youplace phone calls via Google Voice right from your Gmail inbox. Overall, the new service is a great addition to Gmail, and may even convince some users to give up their Skype accounts in favor of Google Voice. But while Google is off to a great start with voice calling in Gmail, there are a few changes I'd like to see that would really put this service over the top.
The service is currently limited to users in the United States, and all calls to the U.S. and Canada will be free until at least the end of the year. Fees for international calls start at 2 cents per minute. Google Voice users can also receive calls directly in their Gmail inbox using their Google Voice number.
Here are a few suggestions


Calling Packages
Low calling rates are great, but one of Skype's great features is its variety of calling packages that make it possible to make unlimited calls to other countries for a flat rate. You can also get region-specific plans such as the unlimited Europe plan or unlimited world, which lets you call more than 40 countries for just $14.99 per month. Packaged plans would be a killer addition for people who need to call specific countries or regions on a regular basis.

Add-ons

Google already has a Google Voice add-on for Chrome and there are extensions for Firefox as well, but it would be great to see the new Gmail voice service integrated with the add-ons as well. Skype has similar add-ons, and I am sure it is only a matter of time until Google offers the same functionality.

International Availability

There's a whole world of Gmail users out there who would likely use this service, and Google has hinted that an international rollout is coming. But even if you're a U.S.-based user it would be a great advantage to know you could use Gmail's new calling feature no matter whether you happened to be in London, England or London, Kentucky.
Google's new voice calling service is a great way to bring even more functionality to your Gmail inbox, but just a few more tweaks and voice calling in Gmail could be the ultimate VoIP service

EVERY HUMAN MUST WATCH THESE PHOTOS........ 1

Crishani | 1:57 AM |


BALANCE FOOD DUMPED ON THE SOIL AFTER THE PARTY


ANOTHER PART OF THE WORLD DOESNT HAVE FOOD TO RUN THEIR LIFE


DON'T waste FOOD any more,
DONATE to the needy


HEAL THE WORLD
 

There´s a place in your heart
And I know that it is love
And this place could
Be much brighter than tomorrow
And if you really try
You´ll find there´s no need to cry
In this place you´ll feel 
There´s no hurt or sorrow

There are ways
To get there
If you care enough
For the living
Make a little space
Make a better place

Heal the world
Make it a better place
For you and for me 
And the entire human race
There are people dying
If you care enough
For the living
Make a better place
For you and for me


Let this be remembered.. . each time we throw away Food!

Mc donalds who throw away food to keep freshness 
these people don't have anything!

people who live in rich countries,, don't know this,, don't want to know
this,, never understand this!


Dil Life Copyright © 2010 Prozine Theme is Designed by Lasantha Home | RSS Feed | Comment RSS